Tuesday, July 21, 2015

Summer garden bruschetta


This recipe is so easy it is hardly a recipe at all but it is my absolute favorite topping for bruschetta or thrown together with some pasta and grilled chicken for a quick and light dinner. 

Bruschetta:
4 vine ripe tomatoes, cored and diced
1 large Clove  garlic, minced 
1 small shallot diced
3 tbs - 1/4 c. Extra Virgin Olive Oil- as much or as little as you like but use the best quality you can because the flavor here is key. 
10-20 fresh basil leaves, torn
Freshly ground pepper and sea salt to taste

Combine all the ingredients and let the flavor to meld. 

Enjoy your harvest everyone! 

K


Wednesday, July 15, 2015

Greek Chicken and Tzatziki

I love Greece! I beautiful place, full of history, great architecture, wonderful food....and unfortunately loads of monetary problems. The news has been so full Greece news lately...most of it not very good, but the constant screen shots of the Acropolis and interviews on the streets with average Greeks reminds me of the two lovely trips I took there. now, while I can't visit Greece right now I can certainlky whip up a batch of easy Greek chicken and homemade tzatziki!


This recipe is quick to throw together and perfect on a hot day when all you really want to do is pour a nice glass of chilled wine and not much else. :)

Greek Chicken Marinade
4 boneless, skinless chicken breasts
1/2 cup lemon juice (fresh or bottled- your choice, I use whatever I have on hand)
4 cloves garlic, whole but smashed
2 tsp dried oregano
1 tsp kosher salt
1 tsp ground black pepper
zest of 1 lemon (optional, but it does make it so much better
1/4 cup fresh parsley, chopped

Combine all the ingredients in a gallon size zip top bag or a shallow baking dish and leave to marinate at least 1 hour, but if you have all day thats even better!

Now Preheat your grill to 400F 
Once hot, grill chicken about 10 minutes per side and cook until internal temperature reaches 160F in the thickest part of the breast.
Remove from the grill and let rest for 5-10 minutes for the meat to rest.


Now for the Tzatziki!

Tzatziki
1 large container Greek Yogurt, your choice of full fat, 2%, or nonfat 
1 large English Cucumber, grated
2 cloves garlic, minced
1 tsp Extra Virgin Olive Oil
1/2 tsp cumin (not traditional but i love it)
1/8 c. minced parsley (optional)
salt and pepper to taste

First off, grate the cucumber and drain it either in your hands or in a clean tea towel. This step is important. If you skip it  your tzatziki will be watery and the flavor will be diluted.

After draining the cucumber, combine all the ingredients and taste- adjust seasoning and serve with the grilled chicken, a greek salad, and pita bread. 

Hope you enjoy - opah!

K

Thursday, July 9, 2015

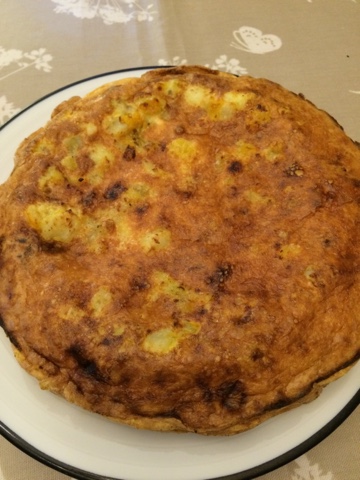
Frittata


Hot, hazy and humid. That is what the weather has been like here for weeks now. And when it is like this, my motivation for cooking wanes just a bit. But the bounty from our (very small) kitchen garden has been an inspiration for more than a few meals when I would have probably just laid out French bread, cheese and charcuterie, and been done with it. 

Yesterday, my daughter plucked two of the most perfect yellow summer squash I have ever seen off our one small, but productive, squash plant. 

So what to do make with it, that my picky son will eat? Frittata! Yes! Who doesn't like eggs with broiled Parmesan cheese on top? 


Yellow Squash Frittata:
1 medium sweet onion, diced
2 medium squash, diced
1 large Yukon Gold potato, small dice
8 eggs, beaten
2 tbsp Extra Virgin Olive Oil
Salt and pepper to taste

Preheat broiler. 
Grab an 8 or 10 inch, nonstick frying pan and place over medium heat. 
Add olive oil and diced onions and squash, salt and pepper to taste, and sauté until soft, about 5 minutes. 
Add potatoes, and sauté until cooked through, about 10 minutes. Note: you may need to add more oil here to prevent sticking and to get the potatoes nice and golden brown. 

Making sure the sautéed veg are not sticking to the pan -if they are, use a bit more oil to coat the pan (here is a good place for your oil mister or spray oil) - add the beaten eggs and let the eggs sit and set for about 5-6 minute.  Do not stir, no matter how tempted you might be. 

Top with a healthy sprinkling of Parmesan cheese...


...and now place in the oven to broil for 5-7 minutes or until cooked through and golden brown and delicious! 
Serve with crusty bread and a  salad...I served this a bowl of gazpacho! Yum! 


This is a great recipe to add anything you like in order to make this frittata your own. Get creative - bacon, asparagus, herbs, goat cheese and sundries tomatoes, even leftover pasta (a favorite in our house)! Hope you enjoy. 
Bon appetite! 

K


Wednesday, July 8, 2015

Pizza! Pizza!


It's a summer pizza party here at our house! The hardest part about this recipe is waiting for the dough to rise. :)

I actually use my focaccia dough to make pizza and I always make it in my Kitchen Aid mixer (but you can certainly knead the dough by hand. Takes a bit more energy but you will burn some calories and look great in a tank top to boot! 

Pizza Dough
(adapted from "The Joy of Cooking" by Rombauer, Becker, and Becker, 1997)
Ingredients:
3 1/3 to 3 3/4 c. AP Flour (plus extra to kneed the dough so it won't stick to the counter)
2 1/4 tsp active dry yeast
1 1/3 c. Warm water 
1 tbsp salt 
1 tbsp sugar
1 tbsp Extra Virgin Olive Oil 
1/2 c. Corn meal for the baking surface

Combine the yeast, sugar and warm water and let sit until bubbles form on the surface. 

While that is sitting, combine 3 1/2 c flour and the salt in you stand mixer (or in a bowl of you are kneeling by hand).

Add the bubbly yeast and water mixture to the flour plus 1 tablespoon extra virgin olive oil and kneed the dough for 10 minutes or until the dough forms a nice dough ball. 

Note: if it is very humid, as it is here in Virginia in July, you may need to add up to an extra half a cup of flour while knees because the flour may have absorbed quite a bit of moisture from the air. Today, I had to add almost 3/4 cup of extra flour! 


Once your dough has been kneeling for 10 minutes, place dough in an oiled boil and leave to rise until doubled in size (can take anywhere from 1-2 1/2 hours depending on how warm your kitchen is)

Now that your dough has doubled in size, punch it down and divide into 4 smaller balls and let rest 10 -20 minutes. 

While you are waiting preheat your oven to 425 F , and prepare your pizza stone or baking sheet by sprinkling which corn meal to prevent the pizza from sticking to the baking surface. 

Now just form your dough into flat discs, I like it on the thin side, so I stretch the dough into a roughly circular shape, place it on the baking tray and then gently stretch it a bit more. 

That's it! Now you are ready to top with whatever your heart desires. 

I am a bit of a pizza purist and go for a bit of marina sauce, fresh mozzarella cheese, tomato, and basil. My family on the other hand goes from everything from fresh garden vegetables to left over Mexican Carnitas! Let everyone make their own and you have your own pizza party!! 


Bon appetite! 

K

Thursday, June 25, 2015

Best Ever Carnitas


Yeah, you read that right. I love caritas... they are my family's favorite Mexican dish. When we lived in San Diego we used to go to this great Mexican place near our house for dinner weekly and caritas were our favorite, but alas once we moved away there were no caritas to be had. So there started our quest for the perfect caritas recipe. I have been tweaking it for about 15 years and the batch I made last night was proclaimed by my better half as "The Best" I have ever made. Thanks sweetie! I think they were damned good too, my kids agree and I hope you will too!

Caritas1 Pork Shoulder, bone in
2 tbsp. Canola oil
1 large sweet onion, diced
5 cloves garlic, minced
1 Tbsp dried Mexican oregano
2 bay leaves
Salt and Pepper
1 c. Orange Juice
1/2 c. Lemon juice
1/2 c. Lime juice


Preheat oven to 325 degrees

Salt and Pepper the Pork shoulder well on all sides.
In a large Dutch oven, sear the meat well on all sides over medium to medium high heat, about 5 minutes per side. This is the most important step! Don't skip it or skimp on the sear time and make sure you sear all around.... even the sides. Trust me, that golden brown crust on that meat and the bits that are in the bottom of the pan are flavoring gold!


 Now that you have that bad boy seared, remove to a plate and move onto he the aromatics.

Turn the heat down to medium, add the onions and garlic, add oregano, bay leaf, salt and pepper and sauté  until slightly translucent.


Now add the citrus juices. Now I'm not going to lie, fresh is best (and if you go fresh please add some of the zest of those beautiful fruits!) but I usually do a combination of fresh and store bought juices. I usually have fresh lemons and limes in the house so I use fresh there and orange juice from one of the great bottled brands you can pick up at the grocery store.

Return the meat to the Dutch oven. The juice should reach about a 1/3 of the way up the meat. If not you can add a bit more of any (or a combination) of the juices to get to that level. Now pop the lid on the pot and sit back and relax while the oven does the rest of the work.

The meat is ready when the bone slips out of the roast easily, this usually takes about 4 hours but cook times vary depending on the size of your roast ( I start looking at it after around 3 1/2 hours, but if you have a very large roast it can take up to 5 hours)

Once the meat is done, remove bone and shred with 2 forks, mixing the meat with all of the wonderful braising liquid. 


Now you are ready to eat! This makes great tacos, burritos, burrito bowls, or nachos but my favorite is as Enchiladas Verde.

This is a great recipe for parties because it feeds a crowd affordably (and deliciously) but it also freezes great!

Hope you give it a try and let me know what you think.

Bon Appetite!

K

Tuesday, June 23, 2015

Summer Grilled Peach and Chicken Salad with Goat Cheese and Lemon Vinegrette


Where did June go?? We have had terribly hot temperatures here this June and today was the worst yet- upper 90s with 90% humidity!! Ugh!! And yet, bought these great looking peaches that I really want to use in one of my favorite summer salads.... Grilled peaches and chicken with goat cheese. I can't think of anything right now that could scream summer. And that it is a breeze to throw together and doesn't require heating up the house is just bonus.


Summer Grilled Peach and Chicken Salad with Goat Cheese and Lemon Vinaigrette
 
4 boneless, skinless chicken breasts
4 medium to large peaches
10 strawberries, sliced
1/2 pint fresh blueberries
4 oz soft goat cheese
1 large bag fresh baby spinach, baby arugula, or romaine lettuce
Salt and Pepper to taste


Vinaigrette:
1 Tbsp Dijon mustard
1 lemon, zest and juice
1 tsp. honey
2 Tbsp Olive oil
2-3 chopped herbs of your choice- anything you have in your fridge or garden will work really. I use thyme and parsley, chives if I have them are nice here too but feel free to play!
Salt and fresh ground pepper to taste
 
Preheat grill on med-high to 400F
Salt and pepper the chicken and grill until the internal temperature is 160 degrees, which is about 10 minutes preside depending on the thickness of you chicken breast.
 Half way through the cooking time is when I add the peaches, cut side down and grill for 5-10 minutes until the juices are running and you have some lovely grill marks.


Once done, remove the peaches and the chicken to a plate and let rest for 5-10 minutes (to allow the juices to redistribute throughout the meat).
 
Now is the time for your vinaigrette. Combine all the ingredients except the olive oil until combined. Now, slowly drizzle in the oil with a small whisk until all of the oil is emulsified. Set aside.

 
Now pop those salad greens into a bowl, add the dressing and to coat. Add your blueberries, strawberries, crumbled goat cheese, grilled peaches and sliced chicken.
 
Serve with warm crusty bread. Hope you enjoy this as much as we do.
 
Bon Appetite!
 
K
 

Tuesday, June 16, 2015

Hazy, hot and humid= Summertime Salmon Salad

Oh my God it's hot! I leave the DC area for a week long class, sunny skies and cool breezes in Newport, Rhode Island and come home to August in June! Lol! I mean it is crazy hot here-low to mid 90s with high humidity, hazy skies, and the occasional thunderstorm. Definitely summertime now. 

Unfortunately, while I would be perfectly content with summer fruit and a cheese platter for dinner, the rest of my family has been swimming in the pool for three hours and needs something a bit more substantial. This kind of day calls for a big dinner salad. Tonight's version:

Garlic-Parsley Butter Grilled Salmon Composed Salad with a Honey-Mustard Vinegrette  


This is a super fast and easy recipe and satisfies even the hungriest little fish at your table. 

Summertime Salmon Salad:

4 Fillets Salmon (wild Alaskan is my favorite but farm raised will do just as well)
1/3c. Softened Butter
2 cloves garlic, minced
1/4 c. fresh parsley, minced
Salt and pepper to taste

Preheat grill to high

For the garlic butter, combine butter, garlic, parsley, salt and pepper until well combined
Pat the salmon fillets dry 
Spread  about 1/2 tbsp butter mixture on each fillet

Once grill reaches 400 degrees, grill the salmon skin, side down, for 8-10 minutes depending on thickness and cook until just cooked through. Remove to a plate

Honey Mustard Vinegrette

1/4 c fresh lemon juice
1/4 c extra Virginia olive oil
1 tbsp honey
1 tbsp Dijon mustard
Salt and pepper to taste

Composed Salad- 

Now here is where you get to use your imagination, favorite flavor combinations, or (in my case) whatever you have in your fridge. 
Today I used chopped romaine lettuce, grape tomatoes, diced cucumber, hard boiled egg halves, olives, and some wonderful leftover marinated oven roast tomatoes I had in the back of my fridge. I'll post that recipe another time :)

I also had some leftover garlic butter, so I popped that on a few ciabatta rolls I had tossed in the freezer a few weeks ago and toasted those up as well. I love the crunch of hot grilled bread along with a cool salad. 
(Bread before picture because my kids are the grilled bread before I remember to grab a photo of it! But trust me when o say it was grilled to crunchy perfection. Lol!)
Now the easy assembly- 
Dress the salad with the Vinegrette, top with the grilled fish and serve with some of the lovely grilled bread. Easy peasy, healthy and satisfying. 

Hope you enjoy! 
Xx
K